
ここでは、Ansible で Windows を管理する場合の、Windows 側のセットアップを行います。
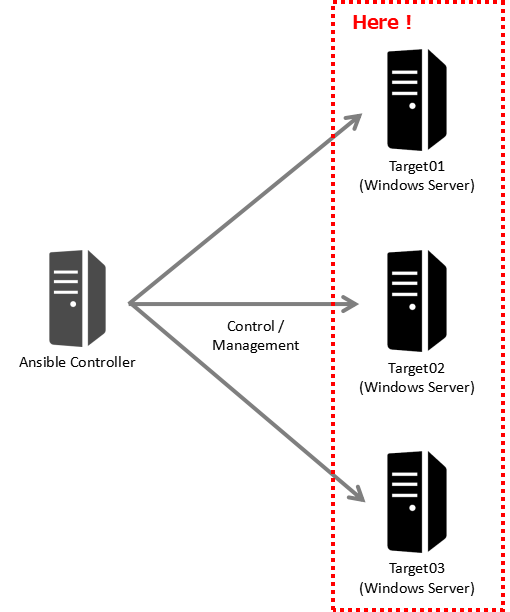
Ansible は、Windows への接続に WinRM を使用するため、Windows 側で WinRM 接続できるようにセットアップします。対象 OS は以下の通りとします。
- Windows Server 2022
- Windows Server 2019
- Windows Server 2016
※ Ansible Controller 側のセットアップについては、下記の記事となります。
>> Ansible: Windows を管理するためのセットアップ
手順
Ansible Controller から Windows に WinRM 接続するため、Windows 側で WinRM リスナーを作成します。
以降、PowerShell で操作を行います。
また、Target の Windows が複数ある場合は、それぞれのサーバーで実行します。
1 (a). 自己署名証明書を使用する場合
自己署名証明書を作成します。
$cert = New-SelfSignedCertificate -DnsName $ENV:COMPUTERNAME -CertStoreLocation Cert:LocalMachine\My-DnsName $ENV:COMPUTERNAME
コンピューター名を発行者とする
-CertStoreLocation Cert:LocalMachine\My
証明書を「ローカル コンピューター\個人」に配置する。
1 (b). インストール済みの証明書を使用する場合
証明書を取得します。
$subject = "CN=" + $ENV:COMPUTERNAME$cert = Get-ChildItem -Path "cert:LocalMachine\My" | Where-Object{$_.Subject -eq $subject}「ローカル コンピューター\個人」にインストールされた証明書 (CN=<コンピューター名>)を使用する例です。
この後、New-WSManInstance で WinRM Listener を作成しますが、New-WSManInstance は、「個人」の証明書のみ使用可能です。
「信頼されたルート証明機関」の証明書は使用できないので、一旦エクスポート後、「個人」にインポートしなおす必要があります。
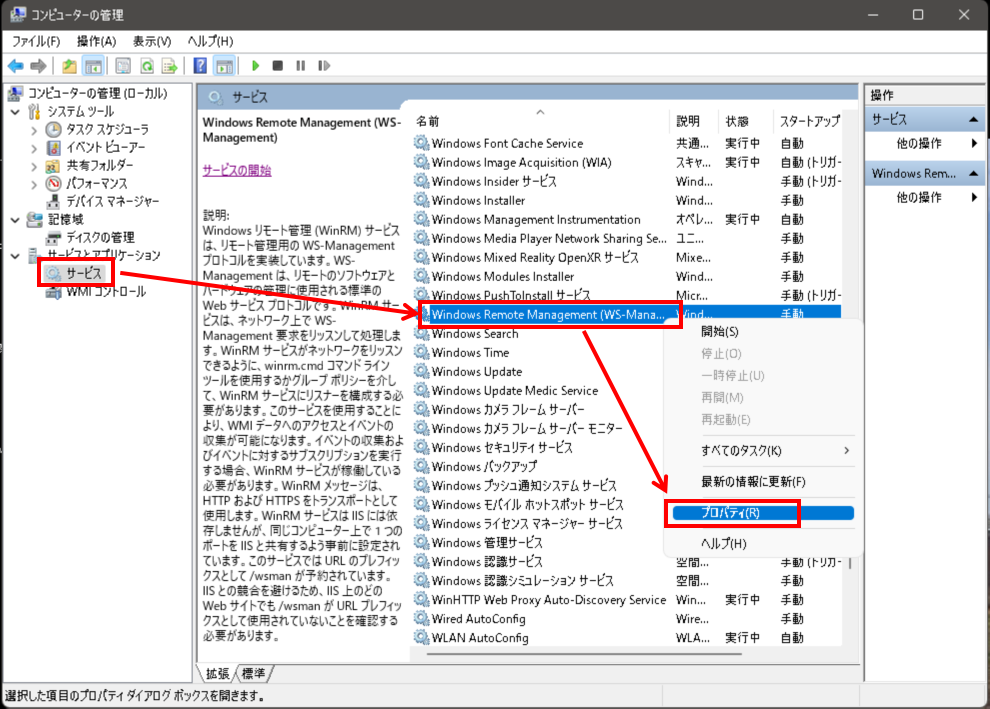
2. WinRM サービスの開始
(1) [コンピューターの管理] – [サービスとアプリケーション] – [サービス] にて、「Windows Remote Management (WS-Management)」を右クリックし、「プロパティ」をクリックします。
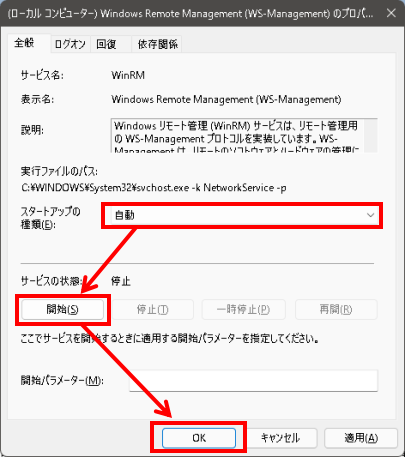
(2) 開いた「Windows Remote Management (WS-Management)のプロパティ」画面の[全般]タブにて、[スタートアップの種類]で「自動」を選択し、[開始]をクリックした後、[OK]をクリックして画面を閉じます。
3. Listener の作成
WinRM Listener を作成します。
$selector_set = @{Address="*"; Transport="HTTPS"}$value_set = @{CertificateThumbprint=$cert.Thumbprint}New-WSManInstance -ResourceURI "winrm/config/Listener" -SelectorSet $selector_set -ValueSet $value_set次のように表示されることを確認します。
wxf                 : http://schemas.xmlsoap.org/ws/2004/09/transfer
a                   : http://schemas.xmlsoap.org/ws/2004/08/addressing
w                   : http://schemas.dmtf.org/wbem/wsman/1/wsman.xsd
lang                : ja-JP
Address             : http://schemas.xmlsoap.org/ws/2004/08/addressing/role/anonymous
ReferenceParameters : ReferenceParameters
4. 作成した Listener の確認
作成した Listener を確認します。
winrm enumerate winrm/config/Listener次のような表示で、Transport=HTTPSのListener が作成されていることを確認します。
Listener
    Address = *
    Transport = HTTPS
    Port = 5986
    Hostname
    Enabled = true
    URLPrefix = wsman
    CertificateThumbprint = <証明書の拇印>
    ListeningOn = 127.0.0.1, <WinRM接続を受信するIPv4アドレス>, ::1, <WinRM接続を受信するIPv6アドレス>
5. Listener のオプション変更
(1) 作成したリスナーのオプションを変更します。
- Basic 認証を無効にする場合
Set-Item -Path WSMan:\localhost\Service\Auth\Basic -Value false- CredSSP を有効にする場合
Enable-WSManCredSSP -role server -Force(2) 設定されているオプションを確認します。
winrm get winrm/config/Service次の表示表示されるので、オプションの値を確認します。
Service
    RootSDDL = O:NSG:BAD:P(A;;GA;;;BA)(A;;GR;;;IU)S:P(AU;FA;GA;;;WD)(AU;SA;GXGW;;;WD)
    MaxConcurrentOperations = 4294967295
    MaxConcurrentOperationsPerUser = 1500
    EnumerationTimeoutms = 240000
    MaxConnections = 300
    MaxPacketRetrievalTimeSeconds = 120
    AllowUnencrypted = false
    Auth
        Basic = false
        Kerberos = true
        Negotiate = true
        Certificate = false
        CredSSP = true
        CbtHardeningLevel = Relaxed
    DefaultPorts
        HTTP = 5985
        HTTPS = 5986
    IPv4Filter = *
    IPv6Filter = *
    EnableCompatibilityHttpListener = false
    EnableCompatibilityHttpsListener = false
    CertificateThumbprint
    AllowRemoteAccess = true
4. Windows ファイアウォールの変更
Windows ファイアウォールで、ポート 5986/tcp の受信を許可します。
New-NetFirewallRule -DisplayName "Winrm (SSL)" -Name "WinRM (SSL)" -Profile Any -LocalPort 5986 -Protocol TCP次のように表示されることを確認します。
Name                          : WinRM (SSL)
DisplayName                   : Winrm (SSL)
Description                   :
DisplayGroup                  :
Group                         :
Enabled                       : True
Profile                       : Any
Platform                      : {}
Direction                     : Inbound
Action                        : Allow
EdgeTraversalPolicy           : Block
LooseSourceMapping            : False
LocalOnlyMapping              : False
Owner                         :
PrimaryStatus                 : OK
Status                        : 規則は、ストアから正常に解析されました。 (65536)
EnforcementStatus             : NotApplicable
PolicyStoreSource             : PersistentStore
PolicyStoreSourceType         : Local
5. 接続確認
自分自身に WinRM (SSL) 接続できることを確認します。
$httpsOptions = New-PSSessionOption -SkipCACheck -SkipCNCheck -SkipRevocationCheckNew-PSSession -UseSSL -ComputerName "localhost" -SessionOption $httpsOptions -ErrorVariable httpsError -ErrorAction SilentlyContinue次のように表示されることを確認します。
 Id Name            ComputerName    ComputerType    State         ConfigurationName     Availability
 -- ----            ------------    ------------    -----         -----------------     ------------
  1 WinRM1          localhost       RemoteMachine   Opened        Microsoft.PowerShell     Available
以上で、Windows 側の WinRM 設定は完了です。
作成した WinRM Listener を削除する場合
上記の手順で作成した WinRM Listener と自己署名証明書を削除する場合は、次の手順を実行します。
(1) Lister を削除します。
Get-ChildItem -Path WSMan:\localhost\Listener | Where-Object { $_.Keys -contains "Transport=HTTPS" } | Remove-Item -Recurse -Force(2) Listener が削除されたことを確認します。
winrm enumerate winrm/config/ListenerTransport=HTTPS の Listener がないことを確認します。
(3) 証明書を削除します。
$target_store = Get-Item "Cert:LocalMachine\My"$target_cert = (Get-ChildItem "Cert:LocalMachine\My" | ? {$_.Subject -eq "CN=${ENV:COMPUTERNAME}";})$target_store.Open("ReadWrite")$target_store.Remove($target_cert)$target_store.Close()